So far in this series, we’ve been using images built by others, pulling them from Docker Hub and running them as containers. That’s useful, but the real power of Docker comes when you build your own images for your own applications.
That’s exactly what we’ll do in this episode. By the end, you’ll have written a real Dockerfile, built a custom image from it, and run your own containerized application — from scratch.
What Is a Dockerfile?
A Dockerfile is a plain text file, literally named Dockerfile with no extension, that contains a set of instructions telling Docker how to build an image, step by step.
Every instruction in a Dockerfile creates a new layer in the image. Docker reads the file from top to bottom and executes each instruction in order.
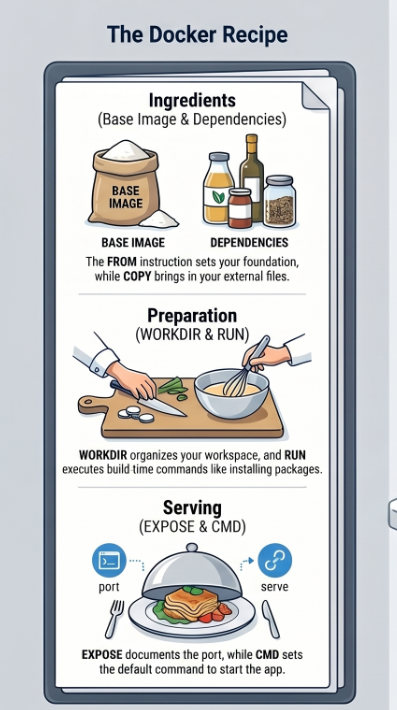
Think of it like a recipe:
- The ingredients are your base image and dependencies
- The steps are your Dockerfile instructions
- The finished dish is your custom Docker image
Once you have that image, you can run it as a container on any machine that has Docker installed.
The Application We’ll Containerize
To keep things practical, we’ll containerize a simple Node.js web app that responds with “Hello from Docker!” when you visit it in a browser.
Here’s the app. Create a new folder called my-docker-app and add these two files:
app.js
const http = require('http');

const server = http.createServer((req, res) => {
  res.writeHead(200, { 'Content-Type': 'text/plain' });
  res.end('Hello from Docker!\n');
});

server.listen(3000, () => {
  console.log('Server running on port 3000');
});
package.json
{
  "name": "my-docker-app",
  "version": "1.0.0",
  "description": "A simple Node.js app in a Docker container",
  "main": "app.js",
  "scripts": {
    "start": "node app.js"
  }
}
Your folder structure should look like this:
my-docker-app/
├── app.js
├── package.json
└── Dockerfile        ← we'll create this next
Writing the Dockerfile
Now, create a file called Dockerfile (no extension) inside my-docker-app and add the following:
dockerfile
# Step 1: Choose a base image
FROM node:20-alpine

# Step 2: Set the working directory inside the container
WORKDIR /app

# Step 3: Copy package files and install dependencies
COPY package.json .
RUN npm install

# Step 4: Copy the rest of the application code
COPY . .

# Step 5: Tell Docker which port the app uses
EXPOSE 3000

# Step 6: Define the command to start the app
CMD ["node", "app.js"]
That’s your first Dockerfile. Now let’s break down exactly what each instruction does.
Dockerfile Instructions Explained
FROM — Choose Your Base Image
FROM node:20-alpineEvery Dockerfile must start with FROM. This sets the base image, the foundation your image is built on top of. We’re using node:20-alpine which gives us Node.js 20 on the lightweight Alpine Linux distribution.
As we learned in Episode 3, Alpine images are much smaller than standard ones (~135MB vs ~1.1GB for the full Node image), a good habit to build from the start.
WORKDIR — Set the Working Directory
WORKDIR /appThis creates a directory called /app inside the container and sets it as the working directory. All subsequent commands (COPY, RUN, CMD) will execute relative to this path.
Without WORKDIR, your files would end up scattered in the root of the container’s file system — messy and hard to manage.
COPY — Copy Files Into the Image
COPY package.json .COPY <source> <destination> copies files from your local machine into the image. The . means “copy to the current working directory”, which we set to /app.
We copy package.json first (before the rest of the code), for an important reason we’ll explain shortly.
RUN — Execute a Command During Build
RUN npm installRUN executes a shell command during the image build process. Here we’re installing the Node.js dependencies defined in package.json.
The result of this command — the installed node_modules folder — becomes a new layer in the image.
COPY . . — Copy the Rest of Your Code
COPY . .Now we copy everything else in our project folder into the container’s /app directory. We do this after npm install for a clever reason -> keep reading.
EXPOSE — Document the Port
EXPOSE 3000This tells Docker that the container will listen on port 3000 at runtime. It’s mostly documentation — it doesn’t actually publish the port. You still need -p when running the container to make it accessible from your machine.
CMD — The Default Startup Command
CMD ["node", "app.js"]CMD defines the command that runs when a container starts. We’re telling Docker to run node app.js to start our web server.
A few important notes about CMD:
- There can only be one
CMDin a Dockerfile — if you write multiple, only the last one is used - It uses JSON array format:
["command", "argument1", "argument2"] - It can be overridden when running the container with
docker run <image> <custom-command>
The Layer Caching Trick (Why Order Matters)
Remember how we copied package.json before copying the rest of the code? This is one of the most important Dockerfile optimizations for beginners to learn.
Here’s why it matters:
Docker caches each layer. When you rebuild an image, Docker checks: has anything changed since last time? If a layer hasn’t changed, Docker reuses the cached version instead of re-running it, saving significant build time.
Without the trick (slow rebuilds):
COPY . .           # copies everything — any code change invalidates this layer
RUN npm install    # re-runs every single time, even if dependencies didn't change
With the trick (fast rebuilds):
COPY package.json .   # only changes if dependencies change
RUN npm install       # cached unless package.json changed
COPY . .              # your code changes here — doesn't affect npm install above
Since you change your application code far more often than your dependencies, this ordering means npm install only re-runs when you actually add or remove a package. On a project with hundreds of dependencies, this can save minutes per build.
The golden rule: put instructions that change rarely near the top, and instructions that change often near the bottom.
Building the Image
Now let’s build the image. Open your terminal, navigate to your my-docker-app folder, and run:
docker build -t my-docker-app:1.0 .Breaking this down:
docker build— the command to build an image from a Dockerfile-t my-docker-app:1.0— tag the image with the namemy-docker-appand version1.0.-> the build context (look for the Dockerfile in the current directory)
You’ll see Docker execute each step in your Dockerfile:
[+] Building 12.3s (9/9) FINISHED
 => [1/5] FROM node:20-alpine
 => [2/5] WORKDIR /app
 => [3/5] COPY package.json .
 => [4/5] RUN npm install
 => [5/5] COPY . .
 => exporting to image
 => naming to my-docker-app:1.0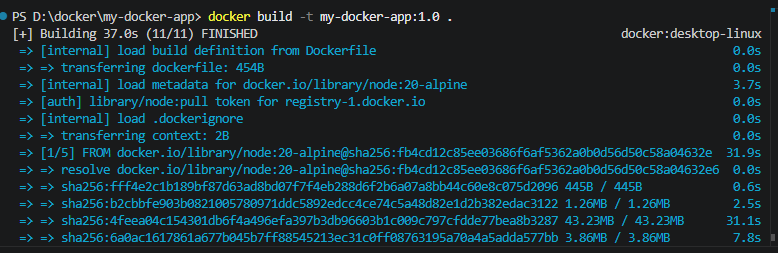
Each step corresponds to an instruction in your Dockerfile. Verify the image was created:
docker imagesYou should see my-docker-app in the list with tag 1.0.
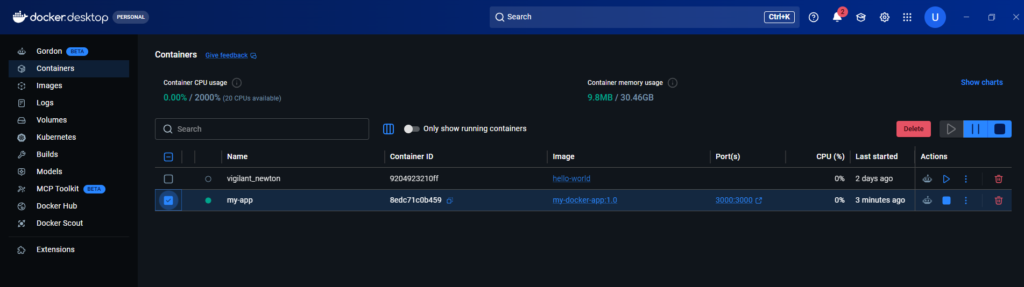
Running Your Custom Container
Now run a container from your image:
docker run -d -p 3000:3000 --name my-app my-docker-app:1.0Open your browser and go to:
http://localhost:3000You should see:
Hello from Docker!Your application is running inside a Docker container that you built yourself.
If you go to Docker Desktop and containers, you can see the Docker container you just created.
Testing the Layer Cache
Let’s prove the caching works. Make a small change to app.js , change the response text:
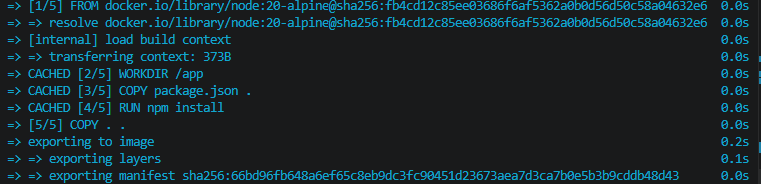
res.end('Hello from Docker! (updated)\n');Now rebuild the image:
docker build -t my-docker-app:1.1 .Watch the output carefully. You’ll see Docker print CACHED next to the npm install step — it didn’t re-run because package.json didn’t change. Only the COPY . . step and everything after it were re-executed.
 => CACHED [3/5] COPY package.json .
 => CACHED [4/5] RUN npm install
 => [5/5] COPY . .       ← only this re-ran
This is the caching system working exactly as intended.
The .dockerignore File
Just like .gitignore tells Git which files to ignore, .dockerignore tells Docker which files to exclude from the build context.
Create a .dockerignore file in your project folder:
node_modules
.git
.gitignore
*.log
README.md
This is important for two reasons:
Speed: Without it, Docker copies your entire node_modules folder (potentially hundreds of megabytes) into the build context before the build even starts — even though RUN npm install will recreate it inside the container anyway.
Security: It prevents accidentally copying sensitive files like .env files containing API keys or passwords into your image.
Your final folder structure:
my-docker-app/
├── app.js
├── package.json
├── Dockerfile
└── .dockerignore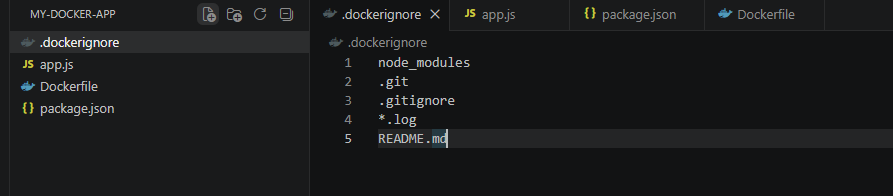
Common Dockerfile Instructions Reference
Here are all the Dockerfile instructions you’ll encounter regularly. During this series, you will understand how it works and when to use:
| Instruction | Purpose | Example |
|---|---|---|
FROM | Set the base image | FROM python:3.12-slim |
WORKDIR | Set working directory | WORKDIR /app |
COPY | Copy files from host to image | COPY . . |
ADD | Like COPY but supports URLs and tar extraction | ADD app.tar.gz /app |
RUN | Run a command during build | RUN apt-get install curl |
CMD | Default command when container starts | CMD ["python", "app.py"] |
ENTRYPOINT | Like CMD but harder to override | ENTRYPOINT ["gunicorn"] |
EXPOSE | Document the port the app uses | EXPOSE 8080 |
ENV | Set environment variables | ENV NODE_ENV=production |
ARG | Build-time variables | ARG VERSION=1.0 |
VOLUME | Create a mount point for persistent data | VOLUME /data |
LABEL | Add metadata to the image | LABEL maintainer="you@email.com" |
CMD vs ENTRYPOINT: What’s the Difference?
This is a common point of confusion for beginners.
CMD sets a default command that can be easily overridden when running the container:
docker run my-app node other-script.js # overrides CMDENTRYPOINT sets a command that always runs -> arguments passed to docker run are appended to it rather than replacing it:
docker run my-app --port=4000 # appends to ENTRYPOINTFor most beginner use cases, CMD is the right choice. Use ENTRYPOINT when you want your container to always behave like a specific executable.
Dockerfile Best Practices for Beginners
Before we wrap up, here are the habits that separate good Dockerfiles from messy ones:
Use specific base image tags. Don’t use FROM node:latest — pin to a version like FROM node:20-alpine so your builds are reproducible.
Combine RUN commands where possible. Each RUN creates a new layer. Chain related commands with && to keep layers lean:
RUN apt-get update && apt-get install -y curl && rm -rf /var/lib/apt/lists/*Always use .dockerignore. Exclude node_modules, .git, logs, and any sensitive files.
Order layers by change frequency. Rarely-changing steps (installing dependencies) go near the top; frequently-changing steps (copying your code) go near the bottom.
Don’t run as root. For production images, add a non-root user for security:
RUN adduser -D appuser
USER appuser
Keep images small. Prefer -alpine or -slim variants. Remove build tools after using them.
Quick Reference: Build Commands
| Command | What it does |
|---|---|
docker build -t name:tag . | Build an image from the current directory |
docker build -f MyDockerfile . | Build using a specific Dockerfile name |
docker build --no-cache . | Build without using cached layers |
docker images | List all local images |
docker rmi name:tag | Remove an image |
docker image prune | Remove all dangling (untagged) images |
What’s Next?
You’ve now written your first Dockerfile, built a custom image, and run your own containerized application. You also understand layer caching, the .dockerignore file, and Dockerfile best practices.
In Episode 5, we’ll tackle one of the most misunderstood topics for Docker beginners — networking. You’ll learn how containers communicate with each other, how port binding works under the hood, and how to set up a network so multiple containers can talk to each other.
→ Continue to Episode 5: Container Networking & Ports
One thought on “Episode 04 -How to Write a Dockerfile: Build Your First Custom Docker Image”