You’ve built your own Docker image and run containers from it. But so far, each container has lived in its own little world, isolated from everything else. In real applications, that’s rarely how things work. A web server needs to talk to a database. An API needs to reach a cache. Your browser needs to reach the app.
That’s where Docker networking comes in.
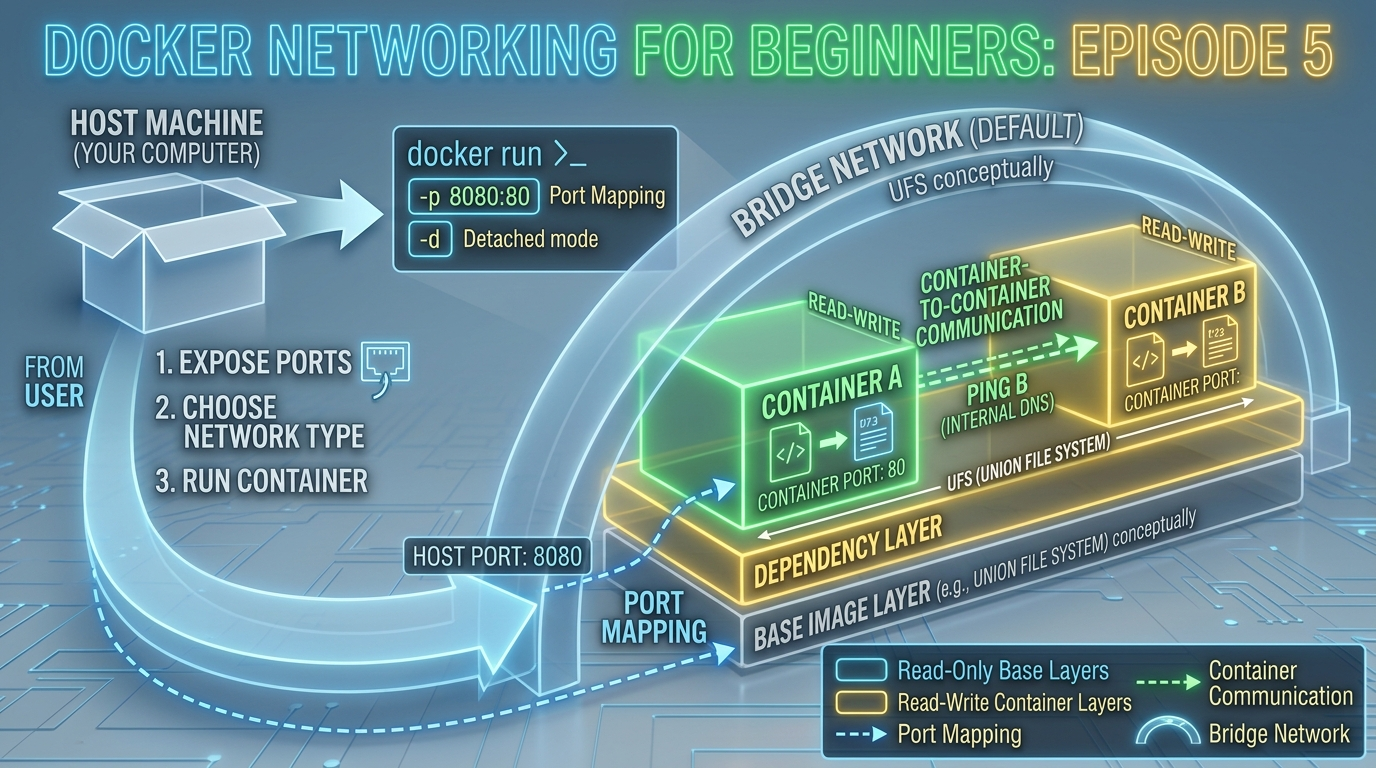
In this episode, we’ll demystify how containers communicate — with your machine, with the internet, and with each other. By the end, you’ll understand port binding, Docker’s built-in network types, and how to connect multiple containers on the same network.
Why Networking Matters in Docker
By default, every container is isolated. It has its own file system, its own processes, and its own network interface. It’s like a computer that isn’t plugged into anything.
For a container to be useful in the real world, it needs to be connected:
- Inward: Your browser or another service needs to reach it
- Outward: It needs to reach the internet or other containers (databases, APIs, caches)
- Sideways: Multiple containers in the same app need to talk to each other
Docker solves all three with its networking system. Let’s start with the most fundamental concept — ports.
Understanding Port Binding
When a container runs an application, that application listens on a port inside the container. But that port is not automatically accessible from your machine -> the container’s network is isolated.
Port binding is the bridge between your machine and the container. It maps a port on your host machine to a port inside the container.
The syntax is:
-p <host-port>:<container-port>For example:
docker run -d -p 8080:80 nginxThis means:
- Traffic arriving at port 8080 on your machine is forwarded to port 80 inside the container
- Visit
http://localhost:8080in your browser and you reach Nginx running inside the container
A helpful analogy
Think of the container as an office building with its own internal room numbering. Port 80 is room 80 inside the building. Port binding is like telling the receptionist: “When someone arrives at entrance 8080, send them to room 80.”
Multiple port mappings
You can bind multiple ports in a single command:
bash
docker run -d -p 8080:80 -p 8443:443 nginxBinding to a specific host IP
By default, Docker binds to all network interfaces (0.0.0.0). You can restrict it to localhost only for security:
docker run -d -p 127.0.0.1:8080:80 nginxThis makes the container unreachable from other machines on your network — useful during development.
Check which ports a container exposes
docker port my-containerDocker Network Types
Docker comes with several built-in network drivers. As a beginner, you’ll mostly work with three:
1. Bridge Network (default)
When you run a container without specifying a network, Docker automatically connects it to a network called bridge. This is a private internal network on your machine.
Containers on the bridge network can:
- Reach the internet (outbound)
- Be reached from your machine via port binding
- NOT communicate with other containers by default (unless you create a custom bridge network)
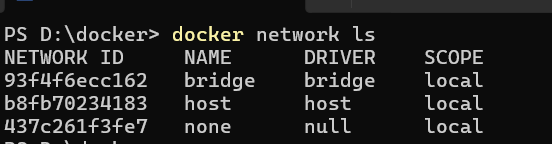
docker network lsYou’ll see bridge listed as one of the default networks.
2. Host Network
With host networking, the container shares your machine’s network stack directly — no isolation, no port binding needed.
docker run -d --network host nginxNow Nginx is directly accessible at http://localhost:80 without any -p flag. Use this when you need maximum network performance, but be aware that it reduces isolation.
Note: Host networking works natively on Linux. On Mac and Windows, Docker runs inside a lightweight VM, so host networking behaves differently and is less commonly used.
3. None Network
Completely disables networking for the container:
docker run --network none my-imageUseful for containers that process files or data and should have zero network access for security reasons.
4. Custom Bridge Networks (the right way to connect containers)
This is where things get really useful. When you create your own bridge network, containers on that network can communicate with each other by name, no IP addresses needed.
We’ll build a full example of this shortly.
Inspecting Docker Networks
Before we connect containers, let’s explore the networking tools available:
List all networks:
docker network lsOutput:
NETWORK ID     NAME      DRIVER    SCOPE
a1b2c3d4e5f6   bridge    bridge    local
b2c3d4e5f6a7   host      host      local
c3d4e5f6a7b8   none      null      local
Inspect a specific network to see which containers are connected:
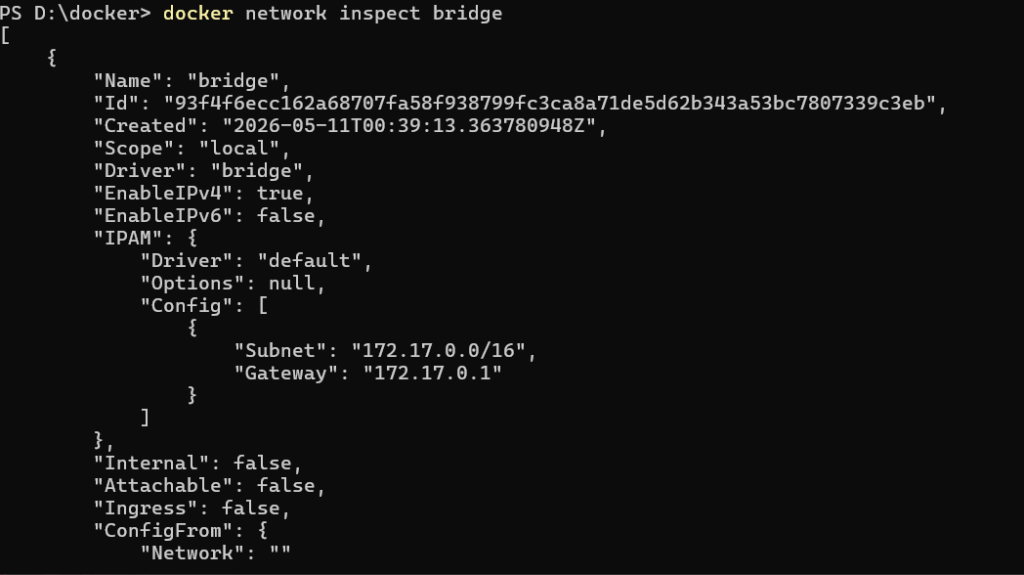
docker network inspect bridgeThis returns detailed JSON including the subnet, gateway, and a list of connected containers with their IP addresses.
Creating a Custom Bridge Network
The default bridge network doesn’t support container-to-container communication by name. A custom bridge network does, and it’s the recommended approach for connecting containers.
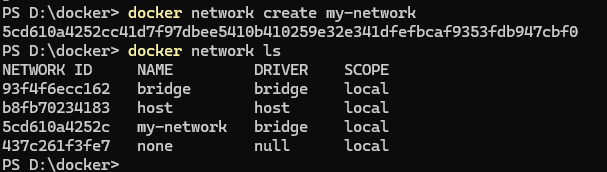
Create one:
docker network create my-networkVerify it was created:
docker network lsYou’ll see my-network listed with the bridge driver.
Practical Example: Connecting a Web App to a Database
Let’s put this into practice with a real-world scenario. We’ll run a PostgreSQL database and a simple web app container, connected on the same custom network so they can talk to each other.
Step 1: Create a custom network
docker network create app-networkStep 2: Run a PostgreSQL container on that network
docker run -d --name my-database --network app-network -e POSTGRES_USER=admin -e POSTGRES_PASSWORD=secret -e POSTGRES_DB=myapp postgres:16-alpine--name my-database— gives the container a name (this becomes its hostname on the network)--network app-network— connects it to our custom network-eflags — set environment variables that PostgreSQL uses to configure itself
Step 3: Run a web app container on the same network
docker run -d --name my-webapp --network app-network -p 3000:3000 my-docker-app:1.0Step 4: Verify they can reach each other
Enter the webapp container’s shell:
docker exec -it my-webapp shFrom inside, ping the database container by name:
ping my-databaseIt responds. The webapp container can reach the database container simply by using its name my-database as the hostname — Docker’s built-in DNS handles the resolution automatically.
This is the magic of custom bridge networks: container names become hostnames.
In your application code, your database connection string would simply be:
postgresql://admin:secret@my-database:5432/myappNo IP addresses. No manual configuration. Just the container name.
Container DNS: How Name Resolution Works
When containers are on the same custom bridge network, Docker runs an internal DNS server that maps container names to their internal IP addresses.
This means:
- Container names are stable, even if the container is restarted and gets a new IP, the name still resolves correctly
- You never need to hardcode IP addresses between containers
- It works automatically, no configuration needed on your part
This is one of the most powerful and underappreciated features of Docker networking for beginners.
Connecting and Disconnecting Containers from Networks
You can connect a running container to a network without restarting it:
docker network connect app-network my-containerAnd disconnect it:
docker network disconnect app-network my-containerThis is useful when you need to attach a debugging or monitoring container to an existing network temporarily.
Common Networking Errors and How to Fix Them
“Port is already allocated”
Error: bind: address already in useAnother process (or another container) is already using that host port. Either stop the conflicting process, or use a different host port:
docker run -p 8081:80 nginx # use 8081 instead of 8080“Connection refused” when accessing localhost
The container is running but the port binding is missing. Stop the container and re-run it with -p host-port:container-port.
Containers can’t reach each other
They’re probably on different networks (or both on the default bridge, which doesn’t support name resolution). Create a custom network and connect both containers to it.
“Name does not resolve” inside a container
The container you’re trying to reach isn’t on the same custom network. Use docker network connect to add it.
Quick Reference: Networking Commands
| Command | What it does |
|---|---|
docker network ls | List all Docker networks |
docker network create <name> | Create a custom bridge network |
docker network inspect <name> | View network details and connected containers |
docker network connect <network> <container> | Connect a container to a network |
docker network disconnect <network> <container> | Disconnect a container from a network |
docker network rm <name> | Delete a network |
docker port <container> | Show port mappings for a container |
docker run -p host:container | Bind a host port to a container port |
docker run --network <name> | Connect a container to a specific network |
What You’ve Learned in This Episode
Let’s recap the key concepts:
- Port binding maps a port on your machine to a port inside a container, making it accessible from outside
- The default bridge network isolates containers from each other but lets them reach the internet
- Custom bridge networks let containers communicate with each other using their names as hostnames
- Host networking removes isolation entirely and shares your machine’s network stack
- Docker’s built-in DNS automatically resolves container names to IP addresses on custom networks
- Container networking errors are almost always caused by missing port bindings or wrong network assignments
What’s Next?
You now know how to connect containers to the outside world and to each other. But there’s one big problem we haven’t solved yet: what happens to your data when a container stops?
By default, everything inside a container is temporary. Stop and remove a container, and all the data it generated disappears. For a database, that’s a disaster.
In Episode 6, we’ll solve this with Docker Volumes — the mechanism for keeping your data safe and persistent across container restarts and removals.