Welcome to the final episode of the Docker for Beginners series. You’ve come a long way.
In Episode 1 you didn’t know what a container was. Since then you’ve built custom images, written Dockerfiles, connected containers over networks, persisted data with volumes, and orchestrated entire application stacks with Docker Compose. That’s a serious set of skills.
There’s one milestone left: getting your application out of your local machine and into the real world.
In this episode we’ll cover three things:
- Pushing your image to Docker Hub so it can be pulled from anywhere
- Deploying a container to a VPS (Virtual Private Server) — the simplest and most universal cloud option
- Deploying to AWS Elastic Container Service (ECS) — the most widely used managed container platform
By the end, you’ll have a live, publicly accessible containerized application running in the cloud.
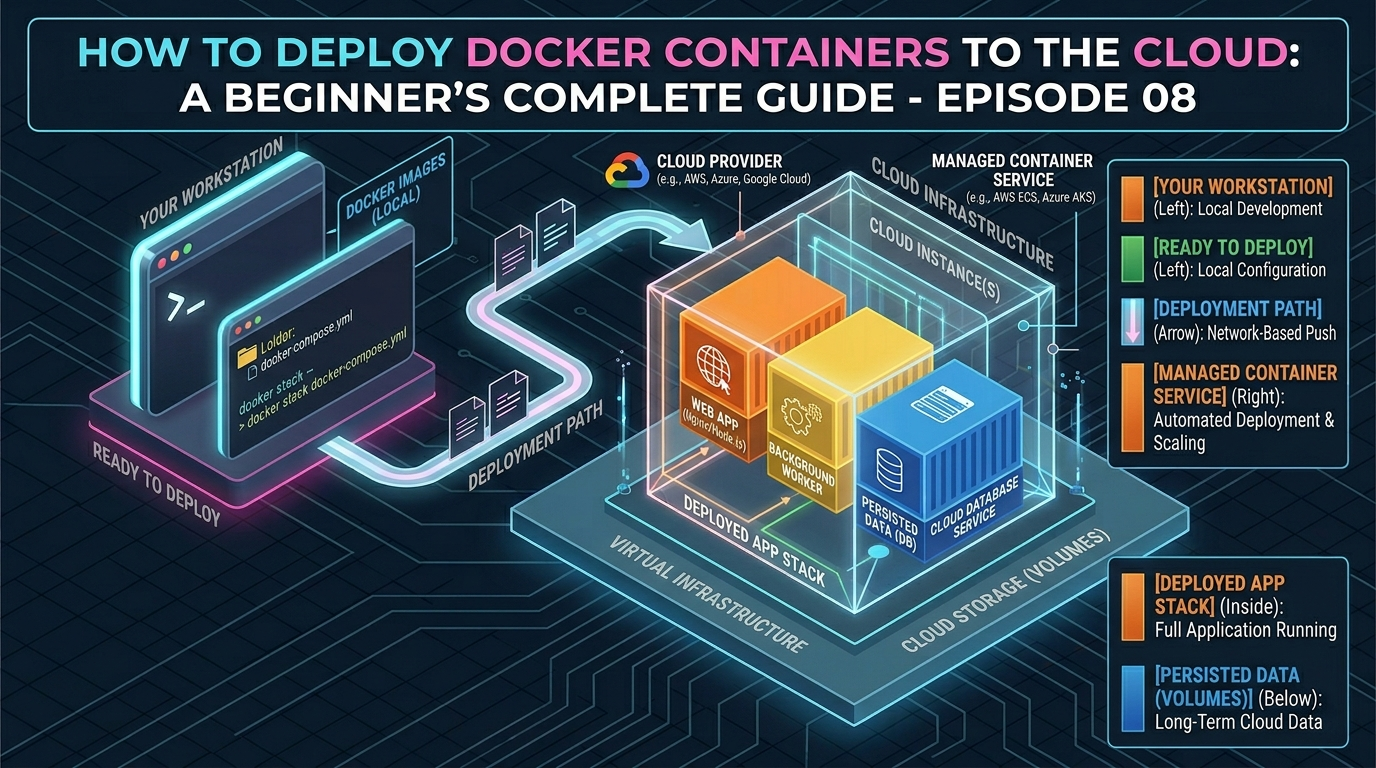
The Deployment Big Picture
Before diving in, let’s understand the overall flow of deploying a Docker application:
- Build your image locally with
docker build - Push the image to a registry (Docker Hub, AWS ECR, Google Artifact Registry)
- Pull the image on your server or cloud platform
- Run the container in production
The registry is the bridge between your local machine and the cloud. Think of it as GitHub but for Docker images – a place to store, version, and share them.
Part 1: Pushing Your Image to Docker Hub
Docker Hub is the default public registry and the easiest place to start. It’s free for public images and gives you one free private repository.
Step 1: Create a Docker Hub account
Go to hub.docker.com and sign up for a free account. Your username will be part of every image name you publish, so choose it carefully.
Step 2: Log in from your terminal
docker loginEnter your Docker Hub username and password when prompted. You’ll see:
Login SucceededStep 3: Tag your image correctly
Docker Hub requires images to follow this naming format:
dockerhub-username/image-name:tagTag your existing image with your Docker Hub username: (replace yourusername with your actual user name for the following commands)
docker tag my-docker-app:1.0 yourusername/my-docker-app:1.0Also tag it as latest:
docker tag my-docker-app:1.0 yourusername/my-docker-app:latestStep 4: Push the image
docker push yourusername/my-docker-app:1.0
docker push yourusername/my-docker-app:latest
Docker uploads each layer individually. Layers already on Docker Hub are skipped — only new layers are uploaded. You’ll see a progress bar for each layer.
Once complete, visit:
https://hub.docker.com/r/yourusername/my-docker-appYour image is now publicly available. Anyone in the world can pull and run it with:
docker run yourusername/my-docker-app:1.0Step 5: Automate future pushes with a build script
Create a simple shell script called push.sh to streamline future releases:
#!/bin/bash
VERSION=$1

docker build -t yourusername/my-docker-app:$VERSION .
docker tag yourusername/my-docker-app:$VERSION yourusername/my-docker-app:latest
docker push yourusername/my-docker-app:$VERSION
docker push yourusername/my-docker-app:latest

echo "Pushed version $VERSION successfully"
Run it with:
chmod +x push.sh
./push.sh 1.1
Part 2: Deploying to a VPS
A VPS (Virtual Private Server) is a rented Linux server in the cloud. Providers like DigitalOcean, Namecheap, Linode (Akamai), Vultr, and Hetzner offer VPS instances starting from around $4–6 per month. This is the most straightforward way to deploy Docker in production — you have full control and it works identically to your local machine.
We’ll use DigitalOcean as our example, but the steps are identical on any provider.
Step 1: Create a VPS instance
- Sign up at digitalocean.com
- Create a new Droplet (DigitalOcean’s term for a VPS)
- Choose Ubuntu 24.04 LTS as the operating system
- Select the basic plan ($6/month, 1GB RAM is enough to follow along)
- Add your SSH key for secure access
- Click Create
Step 2: Connect to your server via SSH
ssh root@your-server-ipReplace your-server-ip with the IP address shown in your DigitalOcean dashboard.
Step 3: Install Docker on the server
curl -fsSL https://get.docker.com | shThis is the official Docker convenience script — it installs everything automatically on Ubuntu. Verify the installation:
docker --versionStep 4: Pull and run your image
Your image is already on Docker Hub — pull it directly onto the server:
docker pull yourusername/my-docker-app:latestRun it in production:
docker run -d \
  --name my-app \
  --restart unless-stopped \
  -p 80:3000 \
  yourusername/my-docker-app:latest
Key difference from local development: --restart unless-stopped tells Docker to automatically restart the container if it crashes or if the server reboots. This is essential for production.
Visit http://your-server-ip in your browser. Your application is live.
Step 5: Deploy with Docker Compose on the VPS
For a full stack application, copy your docker-compose.yml to the server and run it there. The easiest way:
scp docker-compose.yml root@your-server-ip:/root/my-app/
scp .env root@your-server-ip:/root/my-app/
SSH into the server and bring the stack up:
ssh root@your-server-ip
cd /root/my-app
docker compose up -d
Your entire application stack — web server, database, cache — is now running in the cloud.
Step 6: Set up a domain name (optional but recommended)
Point your domain’s DNS A record to your server IP in your domain registrar’s control panel. Then install Nginx as a reverse proxy and Certbot for free HTTPS:
apt install nginx certbot python3-certbot-nginx -y
certbot --nginx -d yourdomain.com
Certbot automatically configures Nginx and issues a free SSL certificate from Let’s Encrypt. Your app is now accessible at https://yourdomain.com.
Part 3: Deploying to AWS Elastic Container Service (ECS)
For larger applications or teams, a managed container platform takes care of scaling, health monitoring, and load balancing automatically. AWS ECS is the most widely used option and a valuable skill for any DevOps engineer.
The AWS ECS Concepts You Need to Know
Before deploying, understand these four terms:
- Task Definition — a blueprint describing which container to run, how much CPU and memory to give it, and which environment variables to set. Think of it as your
docker runcommand written as a configuration file. - Task — a running instance of a Task Definition. This is your actual container.
- Service — keeps a specified number of Tasks running at all times. If one crashes, the Service starts a new one automatically.
- Cluster — the logical grouping that contains your Services and Tasks.
Step 1: Push your image to Amazon ECR
AWS has its own private image registry called Elastic Container Registry (ECR). While you can use Docker Hub with ECS, ECR is faster and integrates seamlessly with AWS services.
Install and configure the AWS CLI:
pip install awscli
aws configure
Enter your AWS Access Key ID, Secret Access Key, and preferred region when prompted.
Create an ECR repository:
aws ecr create-repository --repository-name my-docker-app --region us-east-1Authenticate Docker with ECR:
aws ecr get-login-password --region us-east-1 | docker login --username AWS --password-stdin your-account-id.dkr.ecr.us-east-1.amazonaws.comTag and push your image to ECR:
docker tag my-docker-app:latest your-account-id.dkr.ecr.us-east-1.amazonaws.com/my-docker-app:latest
docker push your-account-id.dkr.ecr.us-east-1.amazonaws.com/my-docker-app:latest
Step 2: Create an ECS Cluster
In the AWS Console:
- Go to Elastic Container Service
- Click Create Cluster
- Choose AWS Fargate (serverless — no servers to manage)
- Name it
my-app-cluster - Click Create
Fargate is the recommended option for beginners — AWS manages the underlying servers entirely. You only pay for the CPU and memory your containers actually use.
Step 3: Create a Task Definition
- In ECS, click Task Definitions → Create new task definition
- Choose Fargate as the launch type
- Name it
my-app-task - Set CPU to
0.25 vCPUand Memory to0.5 GB(minimum — enough for testing) - Under Container definitions, click Add container:
- Name:
my-app - Image URI:
your-account-id.dkr.ecr.us-east-1.amazonaws.com/my-docker-app:latest - Port mappings:
3000(TCP)
- Name:
- Click Create
Step 4: Create a Service
- Go to your cluster → click Create Service
- Launch type: Fargate
- Task definition: select
my-app-task - Service name:
my-app-service - Desired tasks:
1(run one container instance) - Under Networking, select your VPC and subnets
- Enable Auto-assign public IP
- Click Create Service
AWS will pull your image from ECR and start the container. After a minute or two, the Task status shows RUNNING.
Step 5: Access your running application
Click on the running Task → find the Public IP in the details panel. Visit:
http://task-public-ip:3000Your application is running on AWS, managed entirely by ECS Fargate.
Step 6: Add a Load Balancer (production step)
For real production deployments, add an Application Load Balancer (ALB) in front of your ECS service. This gives you:
- A stable DNS name instead of a changing IP address
- HTTPS termination with AWS Certificate Manager (free SSL)
- Automatic traffic distribution if you run multiple Task instances
- Health checks that replace unhealthy containers automatically
In your ECS Service settings, under Load balancing, attach an ALB and configure it to forward traffic to your container’s port. AWS Certificate Manager issues a free SSL certificate for your domain with one click.
Updating Your Application in Production
One of Docker’s greatest advantages is how clean the update process is.
Updating on a VPS
# On your local machine — build and push the new version
docker build -t yourusername/my-docker-app:1.2 .
docker push yourusername/my-docker-app:1.2

# On the server — pull and restart
ssh root@your-server-ip
docker pull yourusername/my-docker-app:1.2
docker stop my-app
docker rm my-app
docker run -d --name my-app --restart unless-stopped -p 80:3000 yourusername/my-docker-app:1.2
Zero manual reinstallation. No dependency conflicts. The old container is replaced cleanly with the new one.
Updating on ECS
Register a new Task Definition revision pointing to the new image tag, then update the Service to use the new revision. ECS performs a rolling update – it starts new containers with the updated image before stopping old ones, so your application stays available throughout the deployment with zero downtime.
Production Checklist
Before going live with any Docker deployment, run through this checklist:
Image security
- Use a specific image tag – never
:latestin production - Use non-root user in your Dockerfile (
USER appuser) - Scan your image for vulnerabilities with
docker scout cves yourusername/my-docker-app:1.0
Container reliability
- Always use
--restart unless-stoppedon VPS deployments - Add health checks to your Dockerfile or Compose file
- Set memory limits to prevent a single container consuming all server resources:
--memory 512m
Secrets management
- Never hardcode passwords in your Dockerfile or Compose file
- Use
.envfiles (never committed to Git) on a VPS - Use AWS Secrets Manager or Parameter Store on ECS
Networking
- Expose only the ports your application actually needs
- Put databases and caches on internal networks — never expose them publicly
- Use HTTPS everywhere — free with Let’s Encrypt (VPS) or ACM (AWS)
Monitoring
- Set up log aggregation — Docker logs go to CloudWatch automatically on ECS
- On a VPS, use
docker logs -f my-appor forward logs to a service like Papertrail - Set up uptime monitoring with a free tool like UptimeRobot
Quick Reference: Deployment Commands
| Command | What it does |
|---|---|
docker login | Log in to Docker Hub |
docker tag image username/image:tag | Tag an image for Docker Hub |
docker push username/image:tag | Push an image to Docker Hub |
docker pull username/image:tag | Pull an image from Docker Hub |
docker run --restart unless-stopped | Auto-restart container on crash or reboot |
docker run --memory 512m | Limit container memory to 512MB |
docker scout cves image:tag | Scan image for security vulnerabilities |
aws ecr create-repository | Create an ECR private registry |
aws ecr get-login-password | Authenticate Docker with ECR |
scp file user@server:/path | Copy files to a remote server |
ssh user@server-ip | Connect to a remote server |
What You’ve Learned in This Episode
- Docker Hub is the default public registry — tag, push, and pull images with simple commands
- A VPS is the simplest cloud deployment option — install Docker, pull your image, run it with
--restart unless-stopped - AWS ECS with Fargate is a managed container platform — no servers to manage, scales automatically
- ECR is AWS’s private image registry — faster and more secure than Docker Hub for AWS deployments
- Production deployments need health checks, secret management, HTTPS, memory limits, and monitoring
- Updating a containerized app is clean and fast — pull the new image, swap the container
You’ve Completed the Series
Let’s take a moment to appreciate how far you’ve come. When you started Episode 1, you didn’t know what a container was. Now you can:
- Explain what Docker is and why it exists
- Install Docker and run containers from the command line
- Understand Docker images, layers, and Docker Hub
- Write Dockerfiles and build custom images
- Connect containers over networks with port binding and custom bridge networks
- Persist data safely using volumes and bind mounts
- Define entire application stacks with Docker Compose
- Push images to Docker Hub and deploy live applications to the cloud
These are not beginner skills anymore. These are the real skills used by professional developers and DevOps engineers every day.
Where to Go From Here
Docker is the foundation — here’s what to explore next:
Kubernetes — the industry-standard system for orchestrating containers at scale across many servers. Think of it as Docker Compose for hundreds of machines. Start with kubernetes.io/docs.
CI/CD Pipelines — automate your build and deployment with GitHub Actions or GitLab CI. Every push to your repository can automatically build your Docker image, run tests, and deploy to production.
Docker Security — go deeper on image scanning, secrets management, network policies, and running containers in rootless mode.
Monitoring & Observability — learn Prometheus and Grafana for container metrics, and the ELK stack (Elasticsearch, Logstash, Kibana) for log management.
Thank you for following the DockerDive series from beginning to end. Share it with a developer who’s just getting started — and stay tuned for our next series on Kubernetes for Beginners.