Over the last six episodes, you’ve learned how to run containers, build images, connect them over networks, and keep their data safe with volumes. But here’s the reality – real applications are never just one container.
A typical web application might consist of:
- A Node.js or Python web server handling requests
- A PostgreSQL database storing user data
- A Redis cache speeding up repeated queries
- An Nginx reverse proxy sitting in front of everything
To run all of this manually, you’d need four separate docker run commands, a custom network, multiple volumes, and a precise startup order. And every time you want to bring it all down and back up, you’d repeat the whole process.
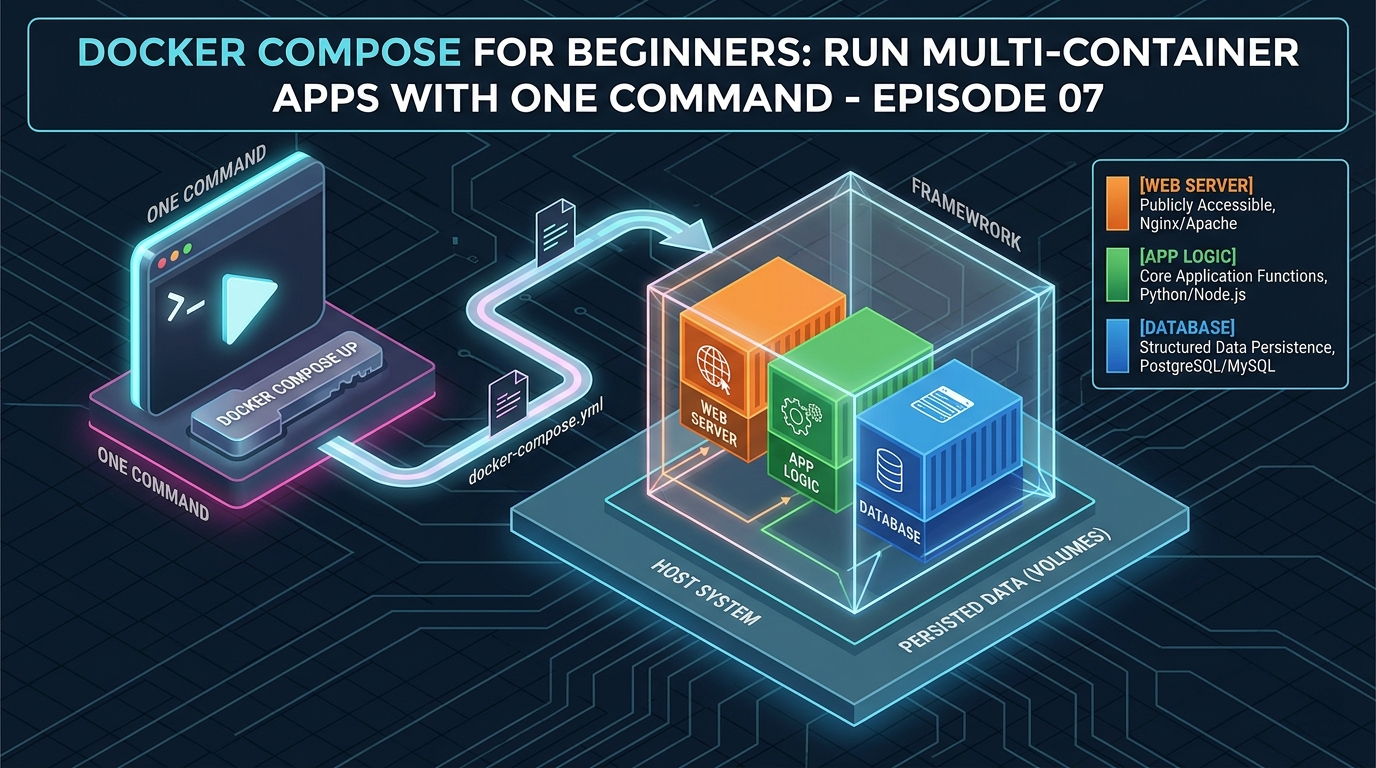
Docker Compose solves this entirely.
With Docker Compose, you describe your entire application stack in a single file called docker-compose.yml — and bring everything up or down with one command. It’s one of the most practical and satisfying tools in the Docker ecosystem.
What Is Docker Compose?
Docker Compose is a tool for defining and running multi-container Docker applications. Instead of running containers one by one from the command line, you write a YAML file that describes:
- Which containers to run (called services)
- Which images to use or which Dockerfiles to build
- How containers connect to each other (networks)
- Where to store persistent data (volumes)
- Environment variables, port mappings, startup order, and more
Once your docker-compose.yml is written, the entire stack is managed with simple commands:
docker compose up      # start everything
docker compose down    # stop and remove everything
That’s it. One file, two commands.
A note on syntax: Docker Compose was originally a separate tool called
docker-compose(with a hyphen). Modern versions of Docker Desktop include it as a plugin. So the command is nowdocker compose(with a space). Both work, but the newerdocker composesyntax is recommended.
Anatomy of a docker-compose.yml File
Before writing a full example, let’s understand the structure of a Compose file:
version: '3.8'

services:
  service-name:
    image: some-image
    ports:
      - "host-port:container-port"
    environment:
      - KEY=VALUE
    volumes:
      - volume-name:/path/in/container
    networks:
      - my-network
    depends_on:
      - other-service

volumes:
  volume-name:

networks:
  my-network:
The top-level keys are:
services— the containers you want to run. Each service is one container.volumes— named volumes used by your services. Declaring them here lets Docker manage them.networks— custom networks for your services to communicate on.
Let’s build a real example from scratch.
The Application We’ll Build
We’ll create a complete web application stack with three services:
- web — a Node.js app (our app from Episode 4)
- db — a PostgreSQL database
- cache — a Redis cache
All three will communicate over a shared custom network, with the database and cache data persisted in volumes.
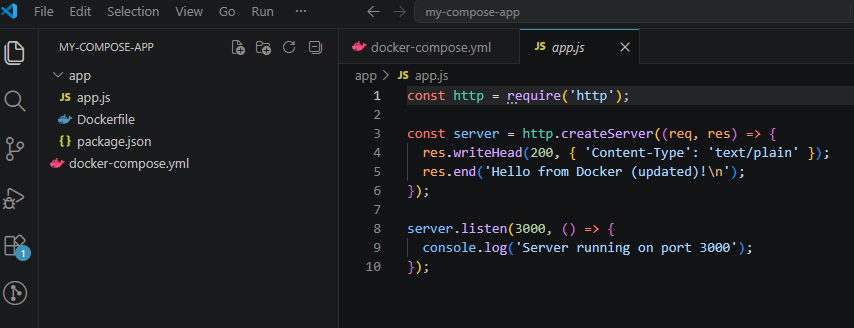
Step 1: Project Structure
Create a new folder called my-compose-app with this structure:
my-compose-app/
├── app/
│   ├── app.js
│   ├── package.json
│   └── Dockerfile
└── docker-compose.yml
The app/ folder contains the Node.js application from Episode 4. The docker-compose.yml lives at the root.
Step 2: Write the docker-compose.yml
Create docker-compose.yml in the root of your project:
version: '3.8'

services:

  web:
    build: ./app
    container_name: my-webapp
    ports:
      - "3000:3000"
    environment:
      - NODE_ENV=development
      - DB_HOST=db
      - DB_USER=admin
      - DB_PASSWORD=secret
      - DB_NAME=myapp
      - REDIS_HOST=cache
    depends_on:
      - db
      - cache
    networks:
      - app-network
    volumes:
      - ./app:/app
      - /app/node_modules

  db:
    image: postgres:16-alpine
    container_name: my-database
    environment:
      - POSTGRES_USER=admin
      - POSTGRES_PASSWORD=secret
      - POSTGRES_DB=myapp
    volumes:
      - pgdata:/var/lib/postgresql/data
    networks:
      - app-network

  cache:
    image: redis:7-alpine
    container_name: my-cache
    volumes:
      - redisdata:/data
    networks:
      - app-network

volumes:
  pgdata:
  redisdata:

networks:
  app-network:
    driver: bridge
Now let’s walk through every part of this file.
Understanding Each Section
The web service
web:
  build: ./app
  container_name: my-webapp
  ports:
    - "3000:3000"
build: ./app— instead of using a pre-built image, Compose builds the image from the Dockerfile in the./appdirectorycontainer_name— gives the container a fixed, readable nameports— maps port 3000 on your machine to port 3000 in the container
  environment:
    - NODE_ENV=development
    - DB_HOST=db
    - DB_USER=admin
    - DB_PASSWORD=secret
    - DB_NAME=myapp
    - REDIS_HOST=cache
Environment variables are passed into the container. Notice DB_HOST=db and REDIS_HOST=cache — these use the service names as hostnames. Docker Compose automatically sets up DNS so services can reach each other by name. No IP addresses needed.
  depends_on:
    - db
    - cache
This tells Compose to start the db and cache services before starting web. It ensures your database is running before the app tries to connect to it.
  volumes:
    - ./app:/app
    - /app/node_modules
Two volumes here:
./app:/app— a bind mount for live code reloading during development/app/node_modules— an anonymous volume that prevents the host’snode_modulesfrom overwriting the container’s installed modules (a common gotcha on Windows and Mac)
The db service
db:
  image: postgres:16-alpine
  container_name: my-database
  environment:
    - POSTGRES_USER=admin
    - POSTGRES_PASSWORD=secret
    - POSTGRES_DB=myapp
  volumes:
    - pgdata:/var/lib/postgresql/data
  networks:
    - app-network
image: postgres:16-alpine— uses the official PostgreSQL image directly (no build step needed)- The environment variables configure the database credentials and name
pgdata:/var/lib/postgresql/data— mounts the named volume so database data persists across restarts
The cache service
cache:
  image: redis:7-alpine
  container_name: my-cache
  volumes:
    - redisdata:/data
  networks:
    - app-network
Simple and clean. Redis stores its data at /data inside the container — mounted to the redisdata named volume for persistence.
Top-level volumes
volumes:
  pgdata:
  redisdata:
Declaring volumes here tells Docker Compose to create and manage them. If you don’t declare them here, Compose won’t manage their lifecycle with the stack.
Top-level networks
networks:
  app-network:
    driver: bridge
Creates a custom bridge network for all three services. Every service in this Compose file can reach every other service by name on this network.
Step 3: Bring the Stack Up
From the my-compose-app directory, run: (If you already have containers with the same name that you have created in previous episodes, delete them from terminal commands or the Docker Desktop application)
docker compose upYou’ll see Docker:
- Build the
webimage from your Dockerfile - Pull the
postgres:16-alpineandredis:7-alpineimages - Create the
app-networknetwork - Create the
pgdataandredisdatavolumes - Start all three containers in the correct order
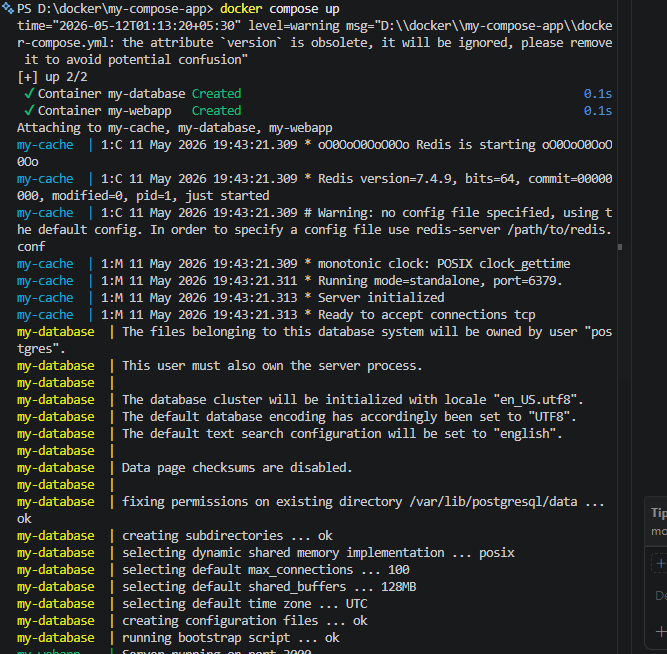
The logs from all three containers stream into your terminal, color-coded by service name. You can visit http://localhost:3000 to see your web app running.
To run everything in the background (detached mode):
docker compose up -dEssential Docker Compose Commands
Viewing running services
docker compose psShows the status of every service in your stack:
NAME           IMAGE              STATUS    PORTS
my-webapp      my-compose-app-web Up        0.0.0.0:3000->3000/tcp
my-database    postgres:16-alpine Up        5432/tcp
my-cache       redis:7-alpine     Up        6379/tcp
Viewing logs
docker compose logsView logs for a specific service:
docker compose logs webFollow logs in real time:
docker compose logs -f webStopping the stack
Stop all containers without removing them:
docker compose stopStart them again:
docker compose startBringing everything down
Stop and remove all containers and networks:
docker compose down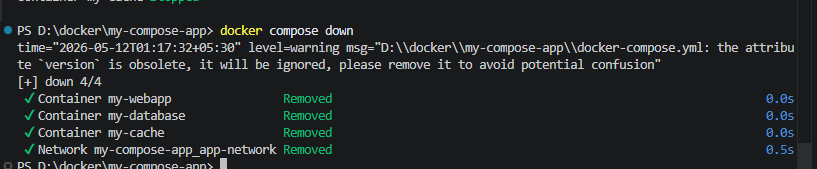
Stop and remove everything including volumes (careful — this deletes your data):
docker compose down -v
Rebuilding after code changes
If you change your Dockerfile or application code and need to rebuild the image:
docker compose up --buildRunning a one-off command in a service
docker compose exec web shThis opens a shell inside the running web container, equivalent to docker exec -it.
Run a one-off command without attaching to a running container:
docker compose run web node --versionScaling a service
Run multiple instances of a service:
docker compose up --scale web=3This starts three instances of the web service. Useful for testing load balancing behavior.
Using Environment Variable Files
Hardcoding passwords and secrets directly in docker-compose.yml is convenient but not safe for real projects. The better approach is a .env file.
Create a .env file in the same directory as your docker-compose.yml:
POSTGRES_USER=admin
POSTGRES_PASSWORD=secret
POSTGRES_DB=myapp
NODE_ENV=development
Then reference these variables in your Compose file with ${} syntax:
services:
  db:
    image: postgres:16-alpine
    environment:
      - POSTGRES_USER=${POSTGRES_USER}
      - POSTGRES_PASSWORD=${POSTGRES_PASSWORD}
      - POSTGRES_DB=${POSTGRES_DB}
Docker Compose automatically reads .env files from the same directory. Add .env to your .gitignore so secrets never end up in version control:
.envdepends_on: A Word of Caution
The depends_on option controls startup order — it ensures the db container starts before the web container. However it does NOT wait for the database to be fully ready and accepting connections — just for the container process to start.
PostgreSQL takes a few seconds to initialize after its container starts. If your app tries to connect immediately, it might fail.
The proper solution is to add a health check to your database service and make web wait for it to be healthy:
db:
  image: postgres:16-alpine
  healthcheck:
    test: ["CMD-SHELL", "pg_isready -U admin -d myapp"]
    interval: 5s
    timeout: 5s
    retries: 5

web:
  depends_on:
    db:
      condition: service_healthy
Now web won’t start until PostgreSQL passes its health check. This is the production-grade way to handle startup dependencies.
Complete Quick Reference
| Command | What it does |
|---|---|
docker compose up | Start all services |
docker compose up -d | Start all services in the background |
docker compose up --build | Rebuild images before starting |
docker compose down | Stop and remove containers and networks |
docker compose down -v | Also remove volumes (deletes data) |
docker compose ps | List running services |
docker compose logs | View logs for all services |
docker compose logs -f <service> | Follow logs for a specific service |
docker compose stop | Stop services without removing them |
docker compose start | Start previously stopped services |
docker compose exec <service> sh | Open a shell in a running service |
docker compose run <service> <cmd> | Run a one-off command in a service |
docker compose build | Build or rebuild service images |
docker compose pull | Pull latest images for all services |
docker compose restart <service> | Restart a specific service |
docker compose --scale <service>=N | Run N instances of a service |
What You’ve Learned in This Episode
- Docker Compose lets you define an entire multi-container stack in a single
docker-compose.ymlfile - Services are the containers in your stack — each can use a pre-built image or build from a Dockerfile
- Services on the same Compose network can reach each other using their service names as hostnames
depends_oncontrols startup order — use health checks for true readiness waiting- .env files keep secrets out of your Compose file and out of version control
docker compose upanddocker compose downmanage your entire stack in one command
What’s Next?
You now have all the core Docker skills — images, containers, networks, volumes, and multi-container apps with Compose. There’s one final milestone left: getting your application out of your local machine and into the real world.
In Episode 8, the final episode of this series, we’ll push your Docker image to Docker Hub and deploy a live containerized application to the cloud — AWS, Google Cloud, or a simple VPS. Your journey from Docker beginner to deploying real apps ends here.
→ Continue to Episode 8: Deploying Docker to the Cloud