In Episode 2, we ran containers using images like nginx and hello-world without really thinking about what those images actually are. We just typed a command and things worked. That’s the magic of Docker, but now it’s time to look under the hood.
In this episode, we’ll answer: What exactly is a Docker image? How is it built? And how do you find the right one for your project?
Understanding images is the foundation for everything that comes next — especially writing your own Dockerfile in Episode 4.
What Is a Docker Image?
A Docker image is a read-only template that contains everything needed to run an application: the code, runtime, libraries, environment variables, and configuration files.
Think of an image as a recipe and a container as the meal you cook from it. The recipe doesn’t change , but you can cook as many meals from it as you want. Similarly, one image can be used to launch dozens of identical containers simultaneously.
Key points to remember:
- Images are read-only — they never change once built
- Containers are running instances of an image
- You can run multiple containers from the same image
- Images are stored locally on your machine and can be shared via registries like Docker Hub
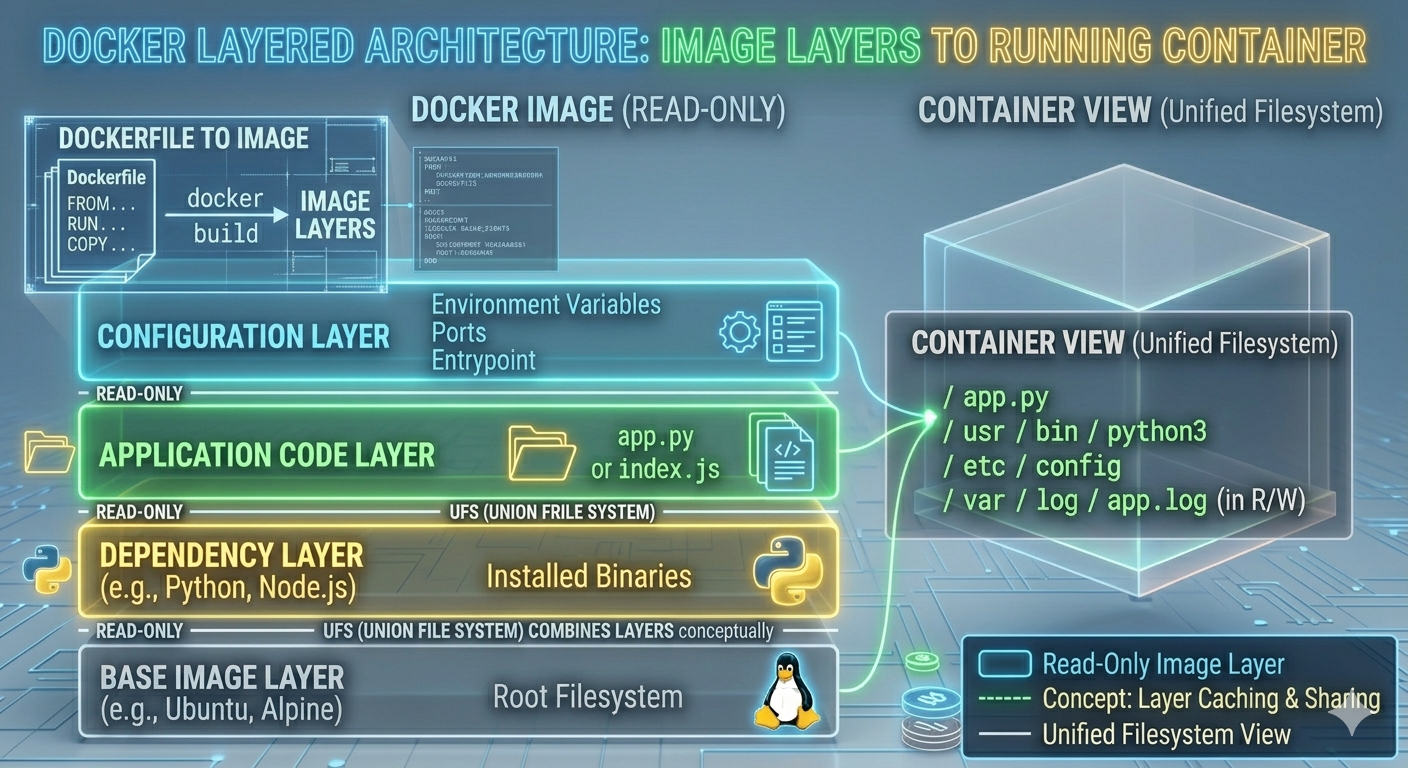
How Docker Images Are Built in Layers
This is where things get clever. Docker images are not single giant files — they are built from a stack of layers, where each layer represents a change or addition.
Imagine building a cake:
- Layer 1 — the base sponge (operating system)
- Layer 2 — the filling (runtime, e.g. Node.js or Python)
- Layer 3 — the icing (your application code)
- Layer 4 — decorations (configuration and environment variables)
Each layer only contains the difference from the layer below it. This is called a union file system.
Why layers matter
Efficiency: If two images share the same base layer (say, both use Ubuntu), Docker only stores that layer once on your machine — saving significant disk space.
Speed: When you rebuild an image after changing your code, Docker only rebuilds the layers that changed. The unchanged layers are pulled from cache instantly. This makes builds dramatically faster.
Shareability: When you push an image to Docker Hub, only the layers that aren’t already on the server get uploaded. Same when pulling — you only download what you don’t already have.
You can inspect an image’s layers with:
docker image inspect nginxOr see a visual history of how it was built:
docker history nginxThis shows each layer, how it was created, and how much space it takes up. (Make sure to run the Docker Desktop application before running these commands)
What Are Base Images?
Every Docker image starts from a base image — the foundation layer that everything else is built on top of.
Base images come in a few flavors:
1. OS base images
These are minimal operating system images. The most commonly used ones are:
ubuntu— familiar Linux environment, great for general usedebian— similar to Ubuntu, slightly leaneralpine— an extremely minimal Linux distro, only ~5MB. Very popular for keeping image sizes small.scratch— literally empty. Used for building ultra-minimal images from nothing.
2. Language runtime images
These start with an OS and add a language runtime on top:
node:20— Node.js 20 on Debianpython:3.12— Python 3.12openjdk:21— Java 21golang:1.22— Go 1.22php:8.3— PHP 8.3
3. Application images
These come with a full application already configured:
nginx— Nginx web server, ready to serve filespostgres— PostgreSQL databaseredis— Redis in-memory data storewordpress— WordPress CMS with PHP included
When you write your own Dockerfile (Episode 4), the very first line will always be FROM <base-image> , declaring which foundation to build on.
Official Images vs. Community Images
On Docker Hub, images fall into two main categories:
Official Images
These are maintained by Docker Inc. or the software’s core team. They are regularly updated, security-patched, and follow best practices. They have clean, simple names with no username prefix:
nginx
postgres
python
node
redis
Always prefer official images for production use or learning. They’re reliable and well-documented.
Community / User Images
These are published by individual developers or organizations. They follow the format username/imagename:
bitnami/wordpress
grafana/grafana
linuxserver/plex
Community images can be excellent; many are maintained by reputable organizations, but always check the number of pulls, stars, and when it was last updated before trusting one.
Docker Hub: Your Image Registry
Docker Hub (hub.docker.com) is the default public registry where Docker pulls images from. Think of it as the App Store for containers.
Searching for images
You can search directly from the terminal:
docker search python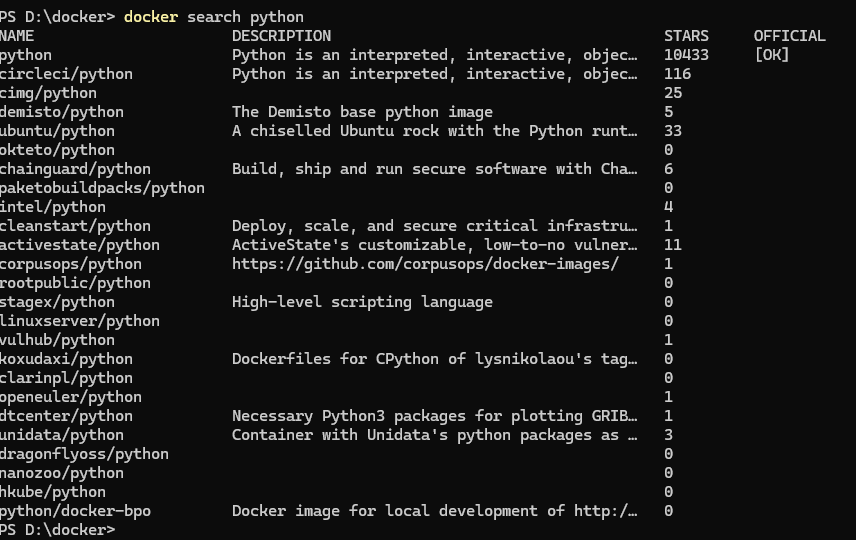
This returns a list of images matching “python” with their description, star count, and whether they’re official. But for a better experience, search at hub.docker.com where you can filter by category and read full documentation.
Understanding image tags
Every image has a tag that identifies a specific version. The format is:
imagename:tagExamples:
docker pull node:20          # Node.js version 20
docker pull node:20-alpine   # Node.js 20 on Alpine (smaller)
docker pull node:latest      # The most recent stable version
docker pull node             # Same as :latest
Important: Using
:latestis convenient but risky in production — the image can change without warning and break your app. Always pin to a specific version tag in real projects, likenode:20.11.0.
Common tag suffixes you’ll see
| Tag suffix | What it means |
|---|---|
:latest | Most recent stable release |
:alpine | Built on Alpine Linux — much smaller size |
:slim | A trimmed-down version of the standard image |
:bookworm | Based on Debian Bookworm (current stable) |
:lts | Long-term support version |
:<version> | A specific pinned version number |
Pulling and Managing Images Locally
Pull an image without running it
docker pull python:3.12-slimThis downloads the image to your machine so it’s ready to use instantly when you need it.
List images on your machine
docker imagesOutput looks like:
REPOSITORY   TAG          IMAGE ID       CREATED        SIZE
nginx        latest       a72860cb95fd   2 weeks ago    188MB
python       3.12-slim    8b0a1f1e2f3c   3 weeks ago    130MB
node         20-alpine    c4f9f5e3b2a1   1 month ago    135MB
hello-world  latest       d2c94e258dcb   1 year ago     13.3kB
Remove an image you no longer need
docker rmi python:3.12-slimNote: you can’t remove an image if a container (even a stopped one) is still using it. Remove the container first with docker rm.
Clean up everything unused at once
docker system pruneThis removes all stopped containers, unused networks, and dangling images in one shot. Add -a to also remove images not tied to any container:
docker system prune -aImage Size Matters
One thing beginners often overlook is image size. Large images mean:
- Slower pull times when deploying
- More storage used on servers
- Larger attack surface for security vulnerabilities
A few practical tips to keep images lean:
Use Alpine variants when you can. The difference is dramatic:
| Image | Size |
|---|---|
node:20 | ~1.1 GB |
node:20-slim | ~240 MB |
node:20-alpine | ~135 MB |
Don’t pull images you don’t need. Only use the base image that matches what your app actually requires.
Remove build tools after using them. When writing Dockerfiles (next episode), install build dependencies and then delete them in the same layer.
Putting It All Together: The Image Lifecycle
Here’s the full lifecycle of a Docker image, from creation to running a container:
- Someone writes a Dockerfile — a set of instructions for building the image
docker build— the Dockerfile is executed layer by layer, creating the imagedocker push— the image is uploaded to Docker Hub or a private registrydocker pull— someone else downloads the image to their machinedocker run— A container is created from the image and starts runningdocker stop/docker rm— the container is stopped and cleaned up- The image itself remains unchanged and ready to spawn more containers
Quick Reference: Image Commands
| Command | What it does |
|---|---|
docker pull <image>:<tag> | Download an image from Docker Hub |
docker images | List all locally stored images |
docker image inspect <image> | Show detailed metadata about an image |
docker history <image> | Show the layer history of an image |
docker rmi <image> | Delete a local image |
docker search <term> | Search Docker Hub from the terminal |
docker system prune -a | Remove all unused images and containers |
docker tag <image> <new-name> | Give an image a new name or tag |
What’s Next?
You now understand what Docker images are, how their layer system works, and how to find and manage them. This sets you up perfectly for the most hands-on episode yet.
In Episode 4, we’ll write our very first Dockerfile — building a custom image for a real application from scratch. You’ll see exactly how each instruction in a Dockerfile creates a new layer, and by the end you’ll have your own image ready to run anywhere.
One thought on “Episode 03 -Understanding Docker Images: Layers, Base Images & Docker Hub”